Anonymous web scraping in Node.js (Incogniton, Puppeteer and Cheerio)

Web scraping powers countless revolutionary use cases, from training large language models to advancing medical research and pricing intelligence, fueling a software market now valued at over $800M. But given the gray area nature of scraping, staying anonymous is the way to go.
And while many question Node.js's flexibility, compared to Python, its single-threaded architecture—running on a multi-threaded Chromium browser—makes it an ideal choice for the async-heavy scraping tasks.
This article will guide you through the step-by-step process of web scraping anonymously using Node.js alongside using a range of tools and techniques. By the end, you'll have the knowledge and skills to get you scraping the web undetected.
Prerequisites
To follow along seamlessly through the course of this tutorial, ensure you have the following knowledge and tools ready:
-
Javascript basics. Understanding the basics of Javascript and using
npmfor dependency management. -
HTML and CSS. Familiarity with the
htmlDOM andcssselectors. -
A Code Editor. You can use any code editor of your choice. I’ll be using VS Code on macOS for this tutorial.
-
Node.js installed. Have the Node.js runtime installed. If not, download and install Node.js to get started.
Set up a Node.js Project
First, create a new directory called anonymous-scraper by running the code below in your terminal:
mkdir anonymous-scraperNavigate into the directory:
cd anonymous-scraperInitialize the Node.js project:
npm init -yThis will create a package.json file in the root folder that helps track your dependencies, and manage installed libraries. You should also add the { "type": "module" } field to your package.json file if it isn't present as the tutorial will run in ES6 module.
This tutorial is split into two tiers, each offering a distinct degree of anonymity and tackling different scraping complexity levels. With this approach, I aim to provide you with a thorough understanding of techniques and strategies across both dimensions.
Now let's begin.
Tier 1: Static-site scraping with Cheerio, Fetch, and user-agents rotation
This tier explores how to scrape static sites using the fetch API for http requests, Cheerio for static HTML parsing, and the user-agents rotation library for anonymity.
The user-agents library helps generate random real-world user-agents, varying the identity of requests to reduce the likelihood of detection and IP tracking by the target website.
While there are other options for making http requests like Axios and Superagent, I chose the built-in Fetch API (starting from v18.0.0) because it is lightweight, and eliminates the need for extra third-party libraries.
However, if you're on an older Node.js version, you may need to install node-fetch to use the fetch() API.
Step 1: Create the scraper file and install the necessary dependencies
Create a new file named anon-scraper1.js and open the file. You can do that by running the following command on your terminal:
touch anon-scraper1.jsThe only required library for this tier are Cheerio and User-agents libraries. Run the following command to install the cheerio and user-agents packages:
npm install cheerio user-agentsStep 2: Fetch the HTML Content of Your Target Website
To fetch the HTML of your target website, you will use the fetch API. This allows you to send a request to the website, retrieve its HTML, and prepare it for parsing. See code:
const fetchStaticData = async () => {
	try {
		// Send GET request to fetch website data
		const PAGE_URL = "https://books.toscrape.com/";
		const response = await fetch(PAGE_URL);

		// Extract text data from the response
		const data = await response.text();

		// Log the extracted data
		console.log(data);
	} catch (error) {
		// Handle errors
		console.error("Error fetching Data ->", error);
	}
};
fetchStaticData();
The fetchStaticData() async function sends a GET request to the specified PAGE_URL, then it retrieves the HTML response as text, and logs it to the console. The try-catch block handles any error during the process.
To run the script in your terminal, use the command below:
node anon-scraper1.jsThe terminal will log the raw HTML content of the target web page, including headings, links, and other elements. Expect many lines of output—that's perfectly normal.
Notice the similarity between the returned html data and the devtools "elements" tab resource when you visit the page itself. This is because fetch() retrieves the raw HTML just as a browser would when loading the page.
Next, we'll target specific details on the page and put the user-agents rotation technique to test.
Step 3: Scrape data from a specific HTML DOM element
In this section, you will find and extract data from a page element using Cheerio's jquery-like syntax.
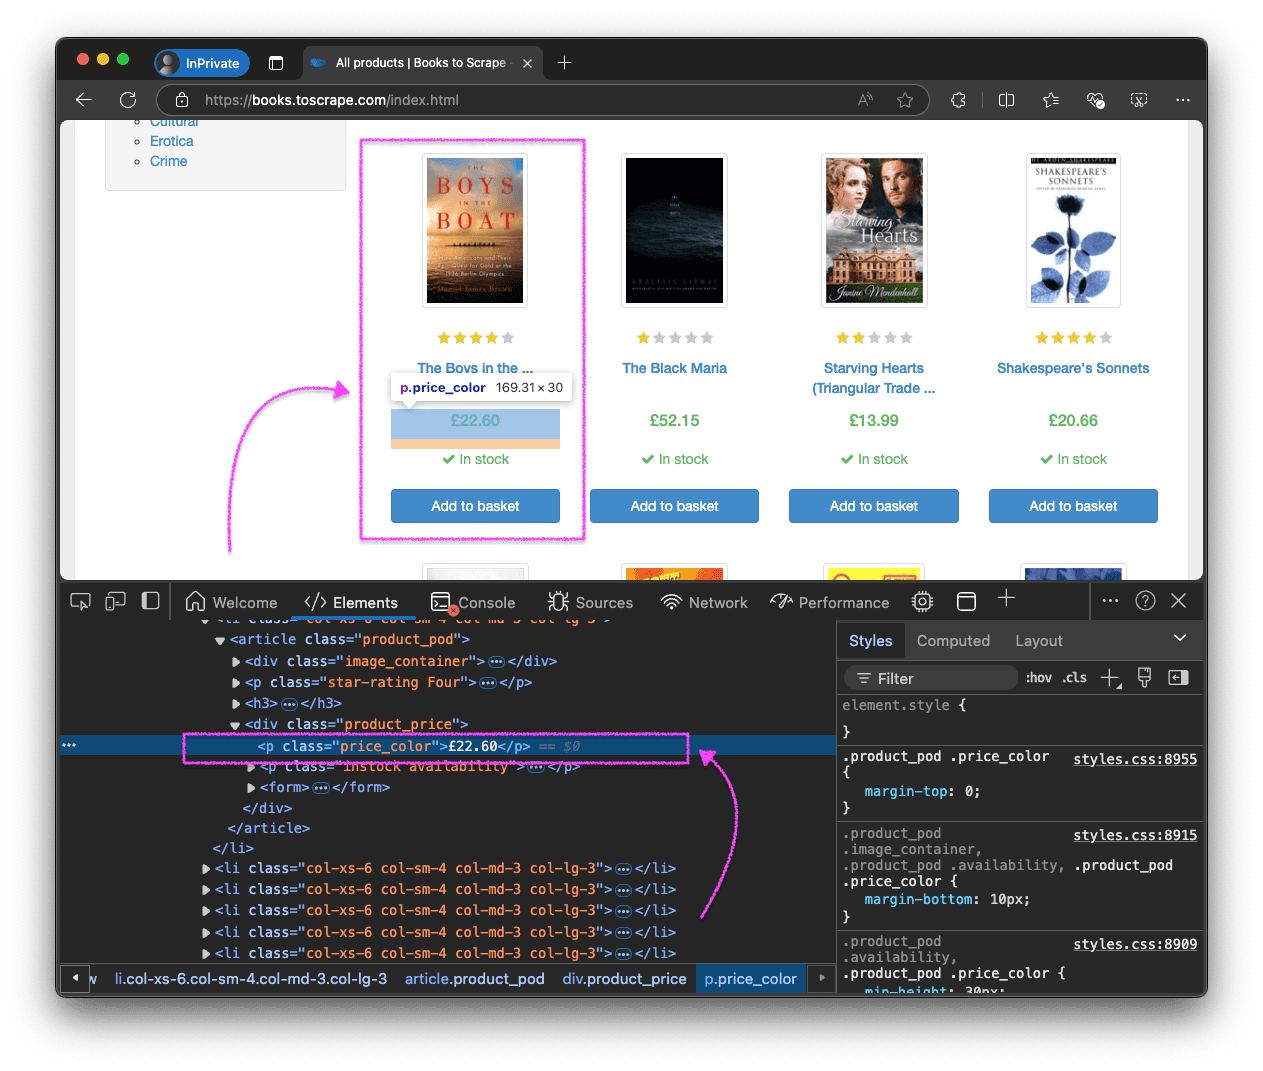
First, open the webpage in a Chromium-based browser (e.g., Chrome, Edge, etc.), inspect the elements, and identify the CSS selectors as shown in the image below with the article > h3 > a and p.price_color selectors.
Once you have the CSS selectors, modify the fetchStaticData() function to include the scraping logic.
// import cheerio and user-agents
import * as cheerio from "cheerio";
import UserAgent from "user-agents";

const fetchStaticData = async () => {
	try {
		const PAGE_URL = "https://books.toscrape.com/";

		// Create random user-agents
		const userAgent = new UserAgent();
		const randomUserAgent = userAgent.random().toString();

		// Send GET request with the random user-agent
		const response = await fetch(PAGE_URL, {
			headers: {
				"User-Agent": randomUserAgent,
			},
		});
		const html = await response.text();

		// Load the HTML into Cheerio for parsing
		const $ = cheerio.load(html);
		const selectors = { name: "article > h3 > a", price: "p.price_color" };

		// Extract last product data
		const lastProduct = {
			name: $(selectors.name).last().text(),
			price: $(selectors.price).last().text(),
		};

		console.log("lastProduct -> ", lastProduct);
	} catch (error) {
		// Handle errors
		console.error("Error fetching Data ->", error);
	}
};

fetchStaticData();
This version utilizes the user-agents library to generate a randomUserAgent header, masking the request as originating from a different device. Cheerio then parses the raw HTML into a DOM-like structure to extract the "name" and "price" of the page's last product. The output you get should look like this:
lastProduct-> { name: "It's Only the Himalayas", price: "£45.17" };You've just completed a static webpage scrape. I recommend rerunning the script a number of times with randomUserAgents logged on the console so you observe the variations and peculiarities in the generated user-agents.
Now let's do something a little more interesting.
Scrape multiple DOM elements
Scraping multiple elements relies on the same logic as a standard loop - an iteration logic. We’ll extract the name and price of all products on the page using the Cheerio .each() method to loop through each product element (.product_pod) and retrieve the required fields. Here's a snippet to demonstrate:
const fetchStaticData = async () => {
	try {
		// fetch and parse HTML with cheerio...

		// Extract all product data from the first page
		const selectors = { name: "article > h3 > a", price: "p.price_color" };
		const productElement = $(".product_pod");

		// create a products array
		const products = [];
		productElement.each(function () {
			const name = $(this).find(selectors.name).text();
			const price = $(this).find(selectors.price).text();

			products.push({ name, price });
		});
		console.log("products ->", products);
	} catch (error) {
		// Handle errors
		console.error("Error scraping Data -->", error);
	}
};
Notice how we use this and not the actual DOM element selector - it's a common pattern with loop methods to contextually reference the current DOM element within the loop. The logged array should look like this:
products -> [
  { name: 'A Light in the ...', price: '£51.77' },
  { name: 'Tipping the Velvet', price: '£53.74' },
  { name: 'Soumission', price: '£50.10' },
  { name: 'Sharp Objects', price: '£47.82' },
  // other products on the page...
]
You’ve just learned how to perform a static webpage scrape. I recommend you try extracting additional fields like images and availability to deepen your understanding.
Limitations of the Tier-1 approach
Unfortunately, the Cheerio-fetch-user-agents approach is not ideal for professional use for a couple of reasons, mainly:
-
Static HTML only. This method is limited to scraping content in the raw HTML and cannot handle client-side rendered content or any content that requires javascript execution.
-
Low-Level Anonymity. User-agent rotation offers minimal privacy, leaving devices exposed to tracking via browser-fingerprinting, IP monitoring, or behavioral analysis.
In the next section, we will explore solutions to improve on this approach and solve its limitations.
Tier 2: Javascript-rendered scraping using Incogniton and Puppeteer (Recommended)
JavaScript-rendered content, or dynamic content, refers to webpage content that is not present in the initial server-rendered HTML but is instead loaded or modified through client-side JavaScript code. Examples include lazy-loaded images, infinite scrolling, and Single-page applications (SPAs).
Disabling JavaScript on a page allows you to view the page's original HTML. Follow these steps:
- Open Chrome DevTools (
F12). - Press
Ctrl + Shift + PorCmd + Shift + Pon Mac to open the Command Menu. - Enter "Disable JavaScript" in the search bar and select the corresponding option.
- Refresh the page, and observe the difference. To return to the default state, just close the devtools panel.
We leverage the Incogniton-puppeteer integration. Let's take a closer look at these tools.
Puppeteer
Puppeteer is a javascript library that automates Chrome browsers, enabling programmatic executions, and user interaction simulations such as clicking or typing.
Incogniton browser
Incogniton is an antidetect browser with a built-in Puppeteer integration, ensuring anonymity for scraping and other automation tasks. The browser also supports proxy integration, enabling traffic routing through different IPs. This is vital for bypassing geo-restrictions and IP blocks.
The Incogniton-puppeteer API will enable us to create fully-isolated browser profiles with distinct browser fingerprints, providing advanced-level anonymity alongside automated web browsing.
Let's get to the process.
Step 1: Install and set up Incogniton
If you already have an Incogniton account, create a profile and get the profile ID. Else, follow these steps for a quickstart:
- Visit the Incogniton download page.
- Select the version for your device (Windows or macOS) and download the Incogniton app.
- Install the app on your computer, following the prompts.
- As the app installs, navigate to the website, choose a plan and create an account.
- Upon installation, sign in with your credentials.
- Navigate to profile management and create a new profile.
- Set up your proxy for IP rotation, Incogniton provides a suite of proxy deals.
- Start the profile and get the profile ID. Ensure you Incogniton app remains open as you proceed to the next steps.
Step 2: Set up the Incogniton-Puppeteer API
Create a new file anon-scraper2.js in the root folder. Then, install the puppeteer-core library. I opt for the lightweight Puppeteer-core over Puppeteer because it does not bundle Chrome, making it ideal when you have an existing Chrome instance as we do with Incogniton.
npm install puppeteer-coreNext, establish a connection between your Incogniton instance and Puppeteer to start the browser.
import puppeteer from "puppeteer-core";

// headless launch
const startIncogniton = async ({ profileId }) => {
	try {
		const launchUrl = `http://localhost:35000/automation/launch/puppeteer`;

		const requestBody = {
			profileID: profileId,
			customArgs: "--headless=new", // use headless mode
		};

		// Make a POST request with body data
		const response = await fetch(launchUrl, {
			method: "POST",
			headers: {
				"Content-Type": "application/json",
			},
			body: JSON.stringify(requestBody),
		});

		const data = await response.json();
		const { puppeteerUrl } = data;

		// Wait for the browser to launch
		console.log("The Incogniton browser is launching...");

		await delay(30000); // await initial boot process

		// Connect Puppeteer to the launched browser
		const browser = await puppeteer.connect({
			browserURL: puppeteerUrl,
			acceptInsecureCerts: true,
		});

		return browser;
	} catch (error) {
		console.error("Error starting Incogniton session ->", error);
		throw error;
	}
};
The code connects Puppeteer to an Incogniton browser instance by fetching the browser's automation URL using the profile ID you provided, then establishing a session with the puppeteer.connect() function. The default port is 35000, if you've configured Incogniton to run on a different port, adjust the launchUrl accordingly.
To confirm that the antidetect browser is working as expected, let's perform an IPHey fingerprint test.
// imports...

const ipheyTest = async (browser) => {
	try {
		const page = await browser.newPage();

		// Navigate to the IP test site and wait till no network requests
		await page.goto("https://iphey.com/", { waitUntil: "networkidle0" });

		// Checks for 'trustworthy' status in the DOM
		const ipResult = await page.$eval(
			".trustworthy-status:not(.hide)",
			(elt) => (elt ? elt.innerText.trim() : "")
		);

		console.log("IP Result ->", ipResult); // expected output: 'Trustworthy'

		await page.close();
	} catch (error) {
		console.error("Error during IPHEY test ->", error);
	} finally {
		await browser.close();
	}
};

// Execute iphey test
const testIncognitonProfile = async () => {
	const browser = await startIncogniton({ profileId: incognitonProfileId }); // your profile Id
	await ipheyTest(browser);
};
testIncognitonProfile();
The expected result is 'Trustworthy'. Other possible results are 'Suspicious' or 'Not reliable', in which case you want to check your configuration or reach out to the Incogniton support.
{ waitUntil: networkidle0 } here instructs puppeteer to wait until there are no more network requests, and although using timeouts instead is common as well, they aren't reliable as they don't guarantee the page is fully loaded under varying network conditions.
Step 3: Scrape a dynamically loaded page
To demonstrate scraping client-side rendered data, we’ll use the js-generated content page from the Quotes to Scrape website. The page dynamically loads quotes with Javascript. You can confirm this by disabling javascript on the page then refresh as described earlier - you get a blank page.
The function below scrapes js-generated data using Incogniton and puppeteer:
const scrapeDynamicContent = async (profileId) => {
	try {
		// Start Incogniton browser
		const browser = await startIncogniton({ profileId });
		const page = await browser.newPage();

		// Navigate to the dynamic page with client-side rendering
		await page.goto("https://quotes.toscrape.com/js/", {
			waitUntil: "networkidle0",
		});

		// Extract quotes and authors from dynamically rendered content
		const quotes = await page.$$eval(".quote", (elements) =>
			elements.map((element) => ({
				text: element && element.querySelector(".text").innerText.trim(),
				author:
					element && element.querySelector(".author").innerText.trim(),
			}))
		);

		console.log("Extracted Quotes ->", quotes);

		// Close the browser after scraping
		await browser.close();
	} catch (error) {
		console.error("Error scraping dynamically loaded content ->", error);
	}
};
Pay attention to the use of .$$eval() over .$eval() here to extract multiple quotes over a single element selection as well as the && operator for short-circuiting so elements with absent fields do not throw unnecessary errors. Here's what the output data should look like:
Extracted Quotes -> [
  {
    text: '“The world as we have created it is a process of our thinking. It cannot be changed without changing our thinking.”',
    author: 'Albert Einstein'
  },
  {
    text: '“It is our choices, Harry, that show what we truly are, far more than our abilities.”',
    author: 'J.K. Rowling'
  },
  {
    text: '“The person, be it gentleman or lady, who has not pleasure in a good novel, must be intolerably stupid.”',
    author: 'Jane Austen'
  },
  // other quotes...
]
Observe how I use the .trim() function to remove unnecessary whitespaces in the data - a good example of implementing proper data cleaning practices in real-world scenarios.
Talking of real-world scenarios, in the next section, you will learn how to handle pagination and crawling through pages recursively for professional across-the-site data extraction.
Handle paginated data and Web crawling requirements
Most practical scraping scenarios require crawling through pages. Web crawling in scraping typically involves identifying links on a page, and following those links to subsequent pages, repeating the process recursively until all relevant data is collected. It's less complex than it sounds.
Let's take a look.
To crawl and scrape paginated data, we will be working with the bookstore website once again, scraping the name and price. Using the Incogniton-puppeteer API, we implement a recursive function to navigate through pages by clicking on the "next" button, and continue this process until there are no more "next" buttons available, indicating that we have reached the last page.
Here's what the recursive function looks like:
const scrapeRecursively = async ({
	browser,
	givenPage,
	scrapeUrl,
	allData,
}) => {
	try {
		// Start Incogniton browser
		const page = givenPage;
		await page.goto(scrapeUrl, { waitUntil: "networkidle0" });

		const quotes = await page.$$eval(".quote", (elements) =>
			elements.map((el) => ({
				text: el.querySelector(".text").innerText.trim(),
				author: el.querySelector(".author").innerText.trim(),
			}))
		);

		allData.push(quotes);

		const nextLink = await page.$("li.next a");

		// if there's a next button, continue scraping
		if (nextLink) {
			const href = await nextLink.evaluate((el) => el.href);
			const nextUrl = new URL(href);

			await scrapeRecursively({
				givenPage: page,
				profileId: incognitonProfileId,
				scrapeUrl: nextUrl.href,
				allData,
			});
		}

		return {
			data: allData,
		};
	} catch (error) {
		console.error("Error scraping dynamically loaded content ->", error);
		throw error;
	}
};
The function navigates to the URL, waits for the page to load, and extracts all books on the page. Next, it checks for a "next page" link using the li.next > a selector. If found, it constructs the full URL and recursively calls itself to scrape data from the next page until there are no further pages to scrape.
Check out a usage example below:
const scrapeAllPages = async () => {
	const browser = await startIncogniton({ profileId: incognitonProfileId });
	const page = await browser.newPage();

	const startingURL = "https://quotes.toscrape.com/";
	const allBooks = []; // To store all scraped data

	await scrapePaginatedData(startingURL, allBooks);

	console.log("All Books ->", allBooks); // logs an array of all scraped books

	await browser.close();
};

// Call the main scraping function
scrapeAllPages();
Congratulations! You have successfully scraped a dynamic content website anonymously. Time to export your data for processing.
Export extracted data as JSON or CSV
Finally, let's export your scraped data. And while there are multiple formats to choose from—including JSON, XML, CSV, or a database like SQLite, I'll focus on JSON and CSV for this tutorial as they are straightforward and versatile, covering most use cases.
Export to JSON
To export extracted data to a JSON file on your machine, use the Node.js built-in fs module. Here's a demonstration:
import fs from "fs/promises";

// Function to save data to JSON
const exportToJSON = async (data, filename = "output.json") => {
	try {
		// prettified JSON output
		await fs.writeFile(filename, JSON.stringify(data, null, 2), "utf-8");
		console.log(`Data exported successfully to ${filename}`);
	} catch (err) {
		console.error(err);
	}
};
The third argument of JSON.stringify() set to 2, specifies the indentation level, enhancing the JSON file's readability and structure.
Export to CSV
You need to convert the JSON to CSV, and for this, we’ll use the lightweight and actively maintained json-2-csv package alongside fs/promises.
import fs from "fs/promises";
import { json2csv } from "json-2-csv";

const exportToCSV = async (data, filePath) => {
	try {
		// Convert JSON data to CSV format
		const csvData = await json2csv(data);

		// Write the CSV data to a file
		await fs.writeFile(filePath, csvData);

		console.log(`Data successfully exported to ${filePath}`);
	} catch (error) {
		console.error("Error exporting data to CSV:", error);
	}

	//example usage - saves the data to anon-scraped.csv
	exportToCSV(scrapedData, "./anon-scraped.csv");
};
This saves the extracted data to a file named anon-scraped.csv in the current directory, which you can open and process with any CSV-compatible software, including Excel and Google Sheets.
Conclusion
There you have it — everything you need to know about scraping the web anonymously. With this knowledge, you have what it takes to tackle web scraping challenges, and in the same vein maintaining your privacy and security. The possibilities are limitless.
But nonetheless, as I have continuously reiterated, always be mindful of each website’s terms of service and uphold ethical practices.

ABOUT THE AUTHOR
Yusuf Abdulhafeez is a software engineer and technical writer, known for his work at Incogniton, Rumi, YoLoop, and beyond. He crafts educative content across various technical domains, including Device intelligence, Fingerprinting, general online privacy, and software development concepts, reaching over a million readers with his insights.
When he's not on his work desk, you may find him outdoor running, working out in the gym, reading a book, or cheering for Arsenal FC.